Taino Solutions integrates seamlessly with Stripe to enable secure electronic payment processing directly within the platform. Accept credit card payments, share payment links with customers, automate invoicing, and keep all payment records synchronized with your policies and customer accounts.
Linking Your Stripe Account - Step by Step
Prerequisites: You must have an existing Stripe account. If you don't have one, visit stripe.com to create an account first.
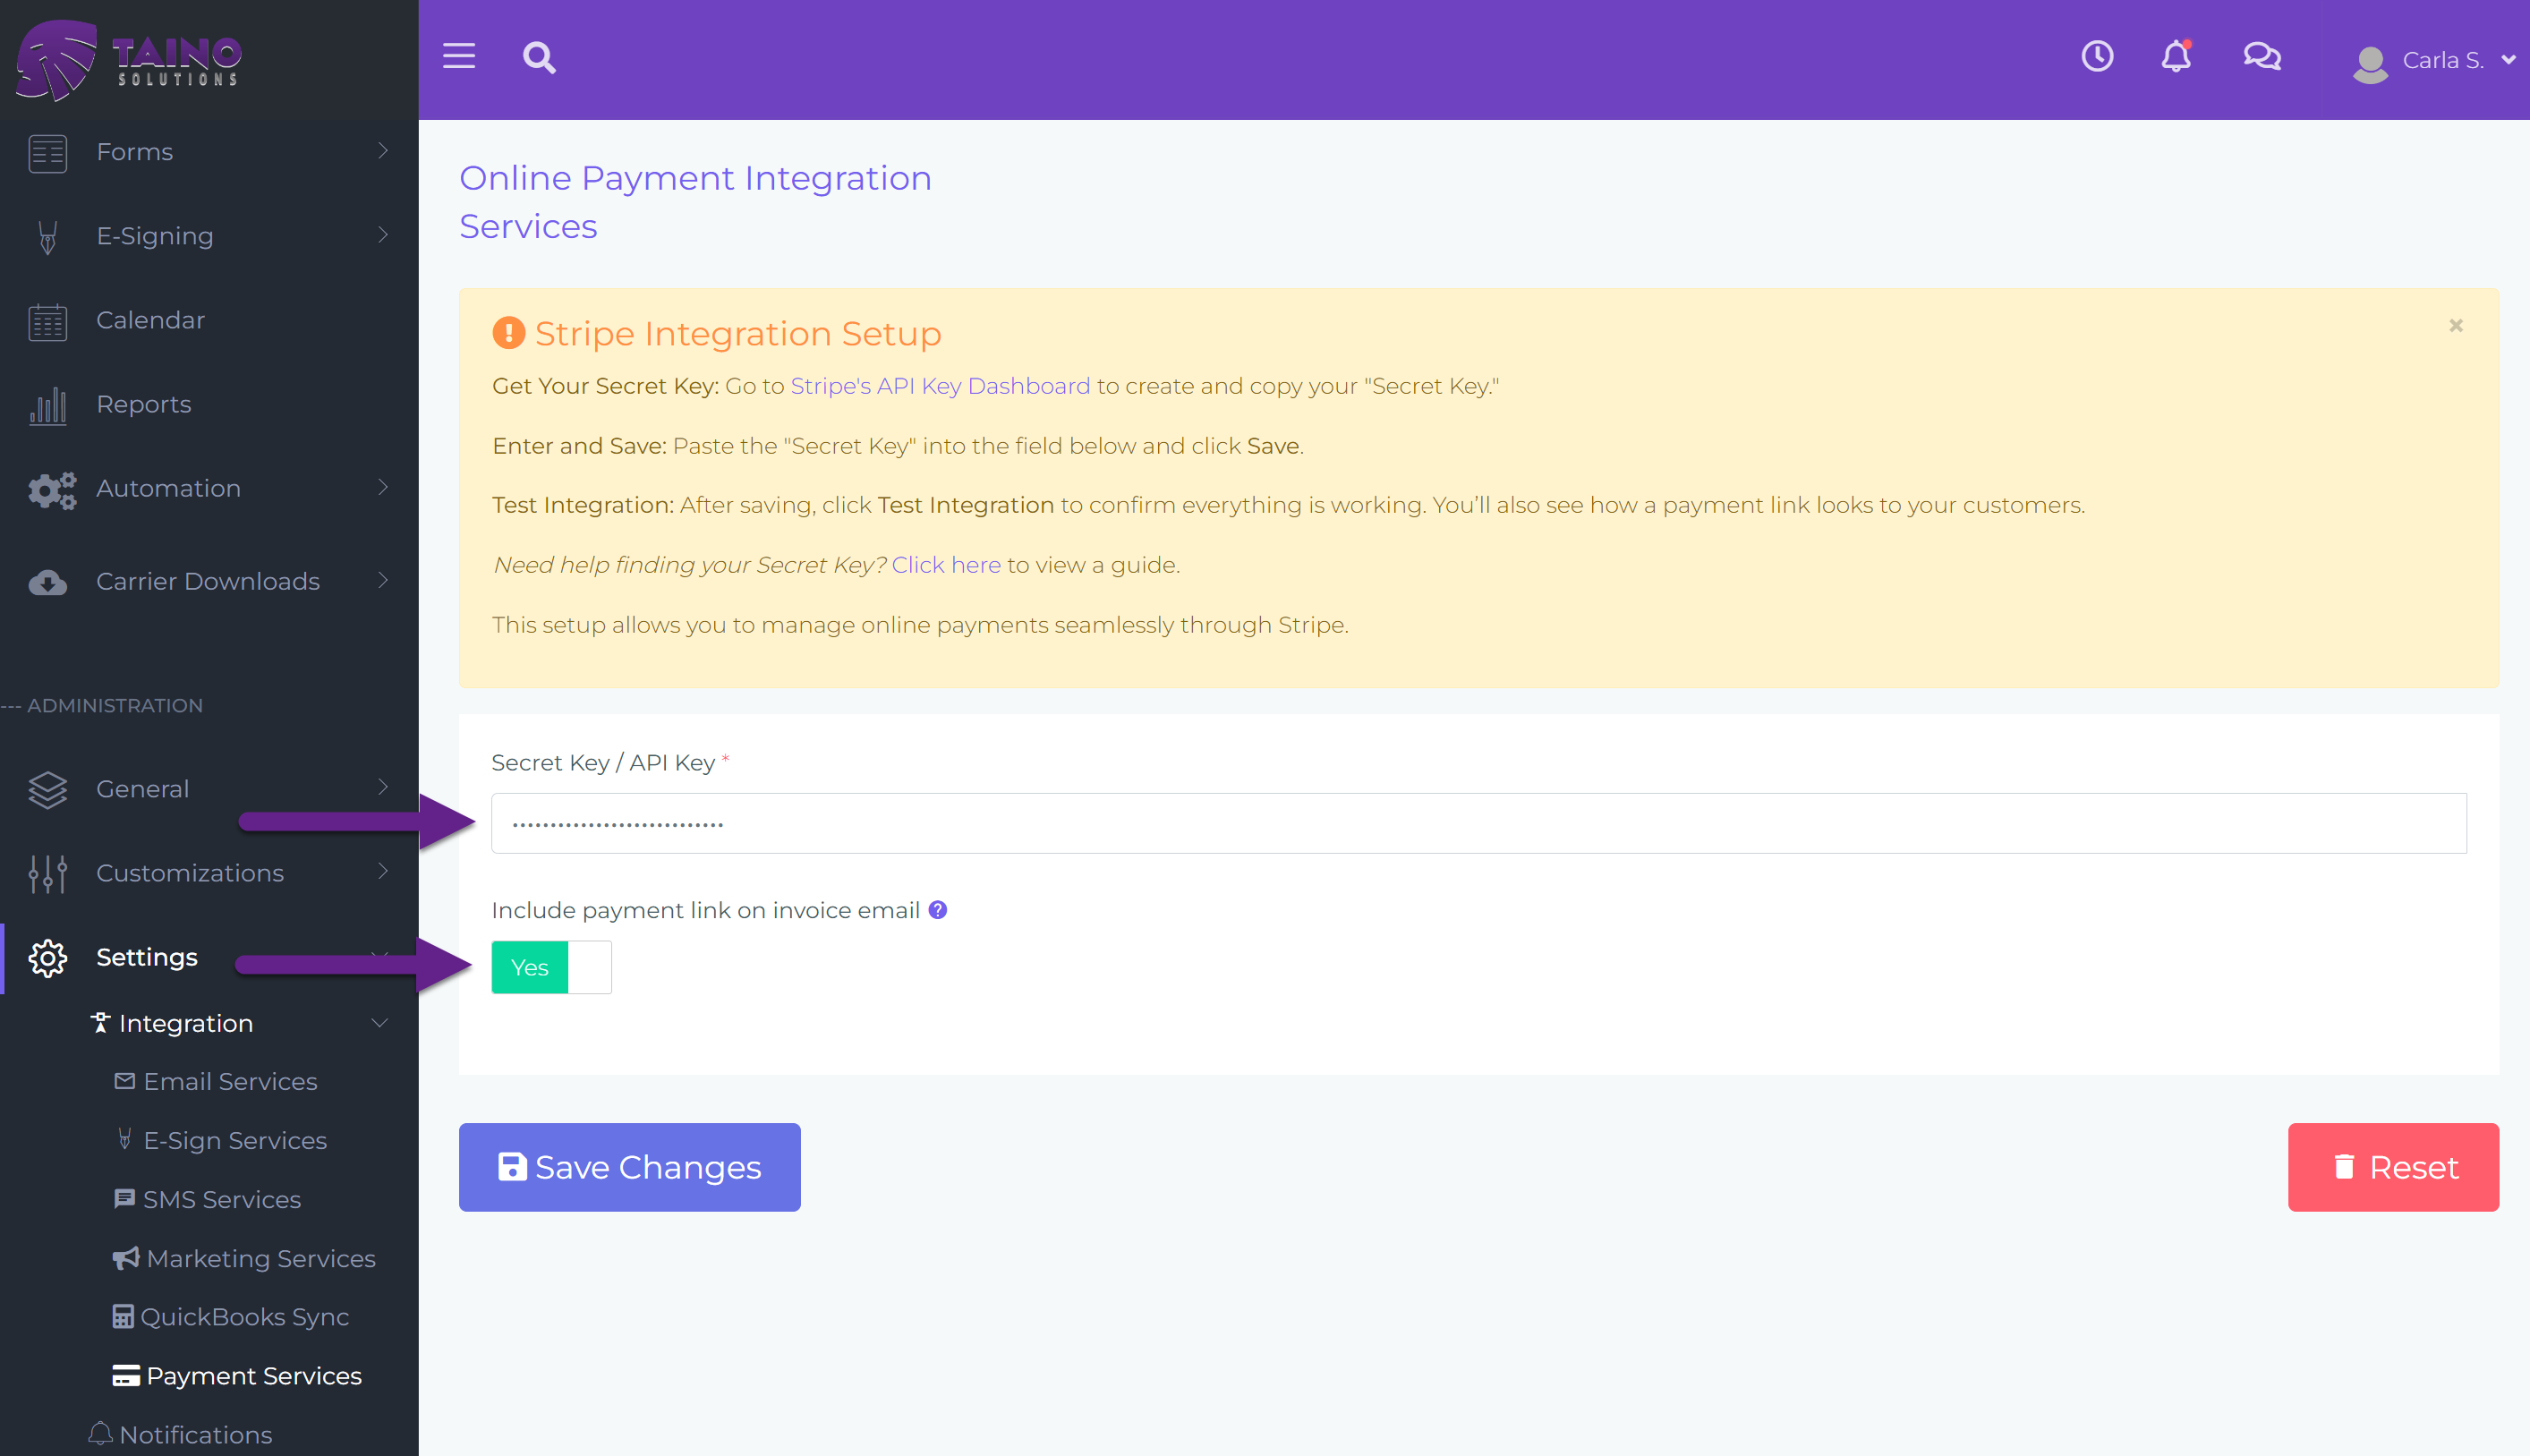
Step 1: Navigate to Payment Services (Admin Only)
- Go to ADMINISTRATION in the left sidebar
- Click on Settings
- Expand Integration
- Click on Payment Services
- This page is only accessible to Agency Owners and Administrators
Step 2: Connect to Stripe
- Click the Connect with Stripe button
- You'll be redirected to Stripe's authorization page
- Log in to your Stripe account (if not already logged in)
- Review the permissions Taino is requesting
- Click Authorize or Connect to grant access
Step 3: Configure Payment Link Options
- Once connected, you'll see a toggle: "Automatically include payment link in invoice emails"
- Enable this if you want customers to receive a clickable payment link in every invoice email
- Disable this if you prefer to manually control when payment links are sent
- This setting can be changed at any time
Step 4: Save Settings
- Click the Save button (typically in the top-right corner)
- You'll see a success confirmation message
- Your Stripe account is now linked and agents can begin processing payments
Capturing Payments for Customers (Phone/In-Person Payments)
When customers call to make a payment or visit the office, agents can capture card payments directly on their behalf. This keeps all payment records within Taino and automatically updates policy balances.
How to Capture a Payment - Step by Step:
Step 1: Navigate to Policy
- Go to Policies in the left sidebar
- Select the specific policy
- You'll see the Policy Details page
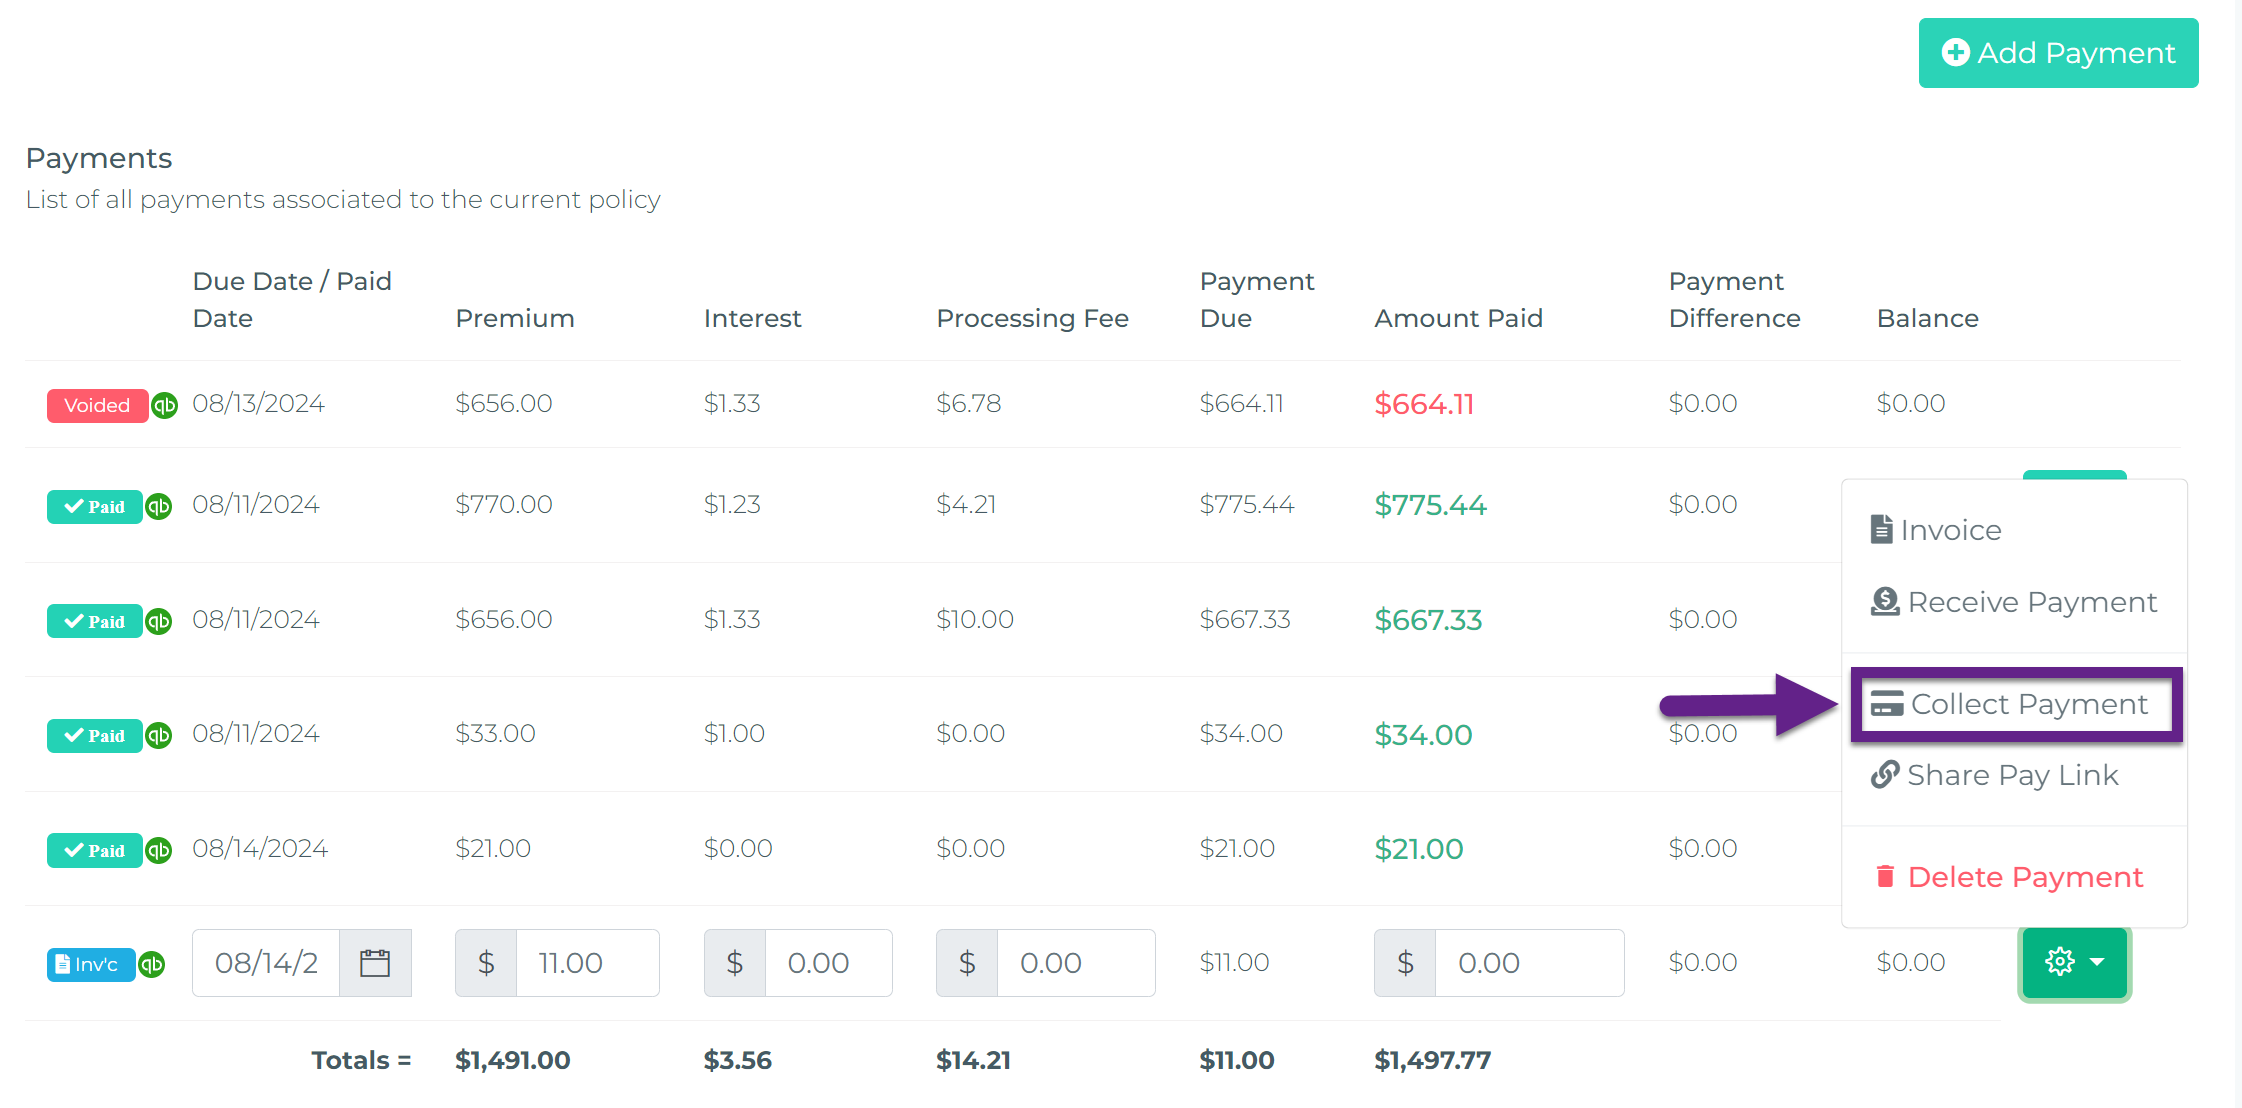
Step 2: Access Payment Options
- Click the purple Take Payment button in the top-right area (next to "Post Commission" button)
- This opens the Payments Details section for this policy
- You'll see the payment schedule table and an + Add Payment button (teal, right side)
Step 3: Capture a Payment
- Click on the gear icon (⚙) next to an existing payment in the table
- From the dropdown menu, select Capture Payment or Receive Payment
- A payment capture dialog opens
Step 4: Enter Payment Details
- Amount: Enter the payment amount
- Payment Method: Select "Credit Card" or "Stripe"
- Card Information:
- Card Number (16 digits)
- Expiration Date (MM/YY)
- CVC/CVV (3-4 digit security code)
- Cardholder Name
- Billing ZIP Code
- Note/Memo: Add optional notes about the payment
Step 5: Process Payment
- Click Process Payment or Capture button
- Taino sends the payment to Stripe for processing (takes 2-5 seconds)
- You'll see a success or error message immediately
- If successful, the payment is recorded and policy balance updates automatically
Important Notes:
- Payment records appear instantly in the policy's payment history
- The customer receives a payment receipt via email (if email is on file)
- All Stripe fees are handled automatically according to your Stripe account settings
- If payment fails, you'll see the specific error message from Stripe (e.g., "Insufficient funds", "Card declined")
Sharing Direct Payment Links with Customers
Instead of capturing payments manually, agents can send secure payment links directly to customers via email or SMS. Customers can then pay at their convenience using any device.
When to Use Payment Links:
- Customer prefers to pay online later
- Scheduled payments that are coming due
- Customer is not on the phone but needs to make a payment
- You want to provide a self-service payment option
How to Share a Payment Link - Step by Step:
Step 1: Navigate to Policy Payments
- Go to Policies in the left sidebar
- Select the policy that needs payment
- Click on the Payments tab or section
Step 2: Create or Select Payment Record
- For scheduled payments: Locate the upcoming payment in the payment schedule list
- For new payments: Click + Create Payment to create a new payment record
- Enter amount, due date, and description
- Save the payment record
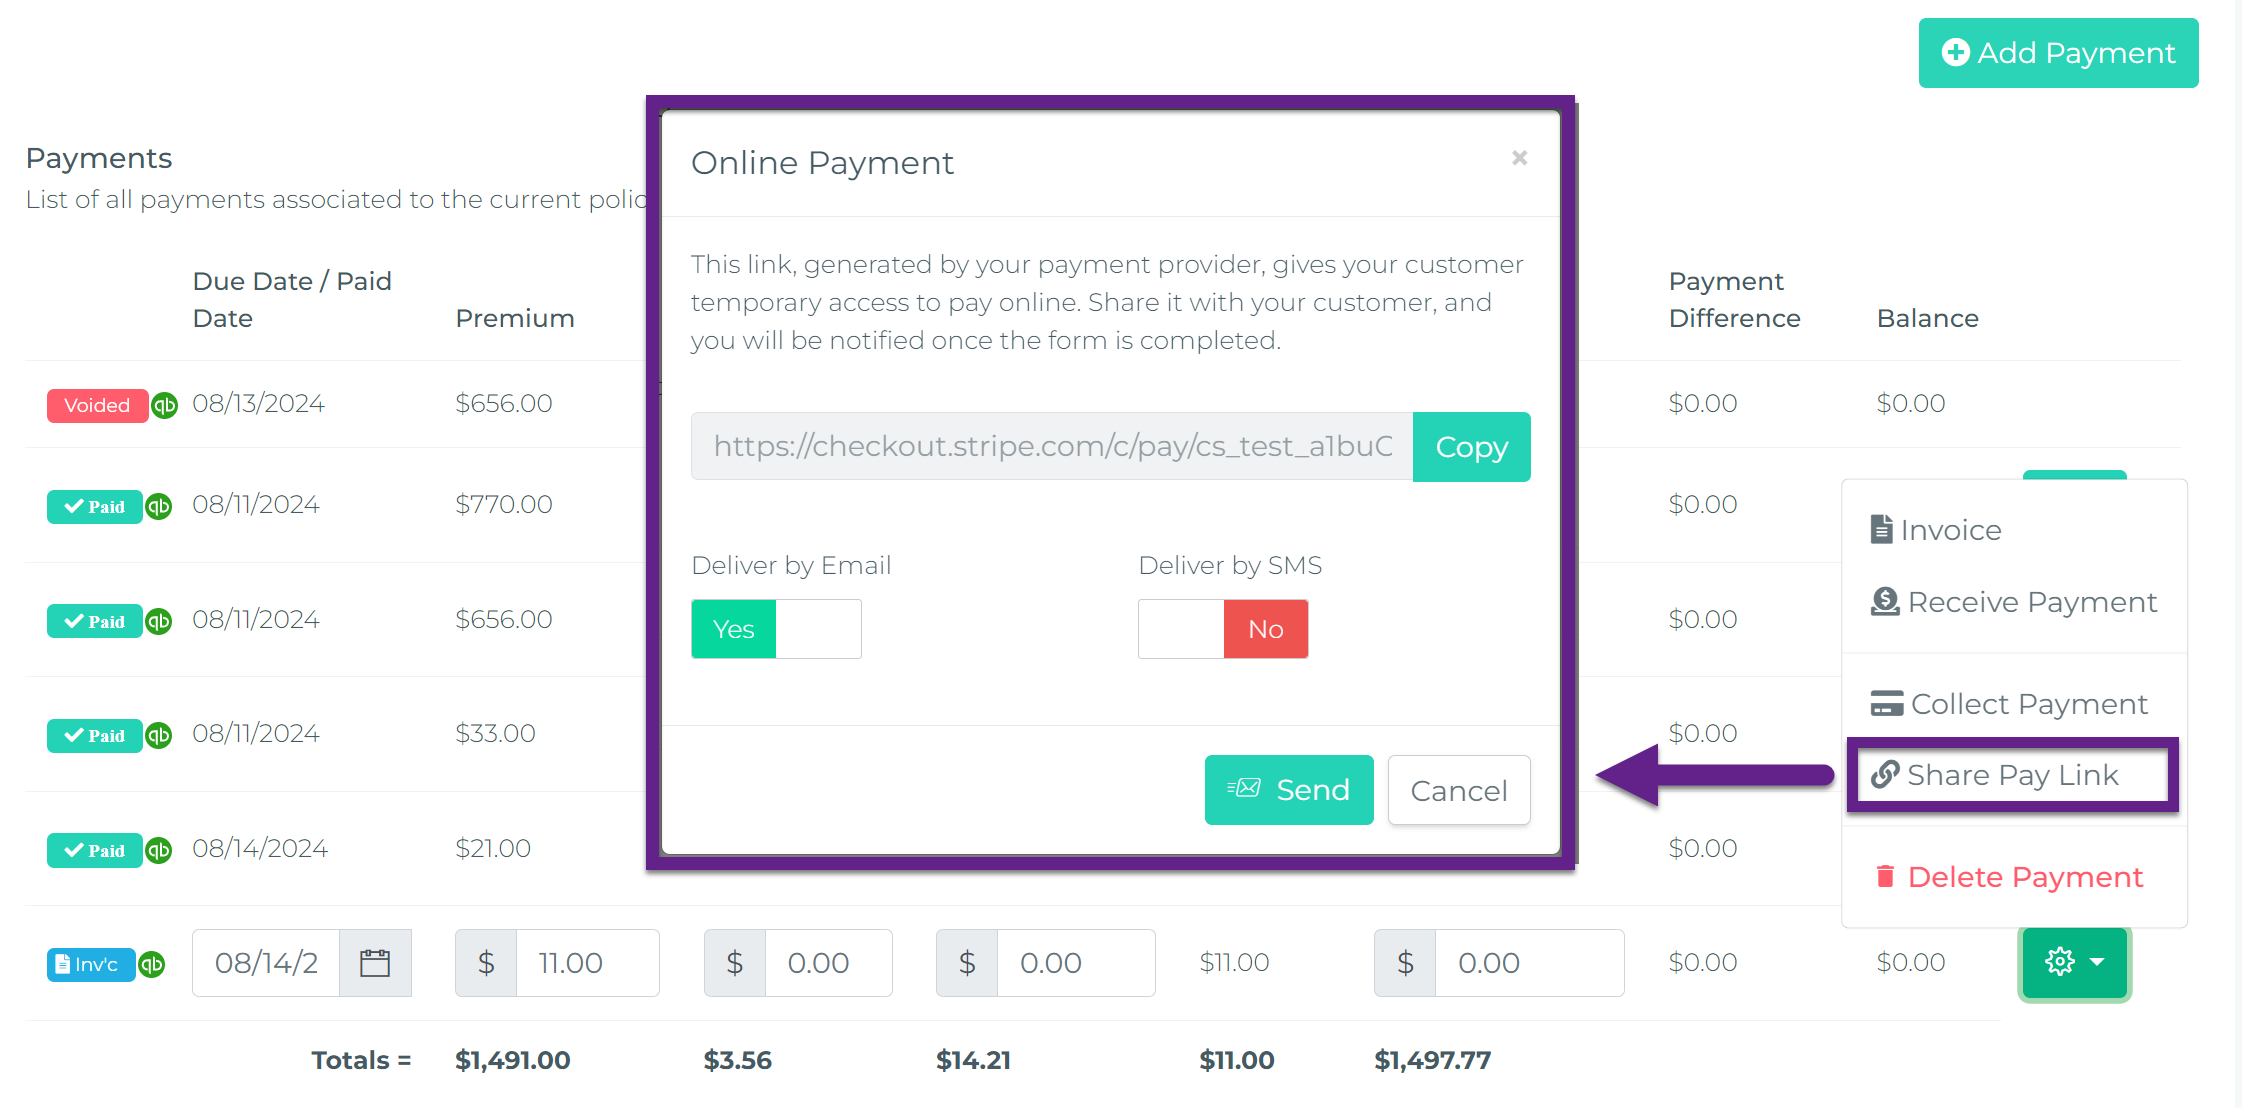
Step 3: Share Payment Link
- Next to the payment record, click the Share button or Send Payment Link option
- Choose your preferred method:
- Email: Payment link sent to customer's email address
- SMS: Payment link sent as a text message to customer's mobile number
- Optionally add a custom message
- Click Send
Step 4: Track Payment Status
- The payment record shows status: Pending, Paid, or Failed
- When the customer completes payment, status updates to Paid automatically
- You receive an instant notification (email or in-app) when payment is completed
- Policy balance updates immediately
Customer Experience:
- Customer receives email/SMS with a secure payment link
- Clicks the link to open Stripe's secure payment page
- Enters card information and confirms payment
- Receives immediate payment confirmation
- Payment is recorded in Taino within seconds
Invoicing Customers with Payment Links
Generate professional invoices and email them to customers with embedded payment links. Customers receive a PDF invoice and can pay instantly with one click.
How to Invoice a Customer - Step by Step:
Step 1: Navigate to Customer Invoicing
- Go to Customers in the left sidebar
- Select the customer you want to invoice
- Look for the Invoices tab or Billing section
Step 2: Create Invoice
- Click + Create Invoice or Generate Invoice button
- The invoice creation dialog opens
- Fill in invoice details:
- Invoice Date: Defaults to today
- Due Date: When payment is due
- Line Items: Add items/services with amounts
- Description
- Quantity
- Unit Price
- Total (calculated automatically)
- Notes/Terms: Optional payment terms or notes
Step 3: Preview and Save Invoice
- Click Preview to see how the invoice will look
- Verify all information is correct
- Click Save to generate the invoice
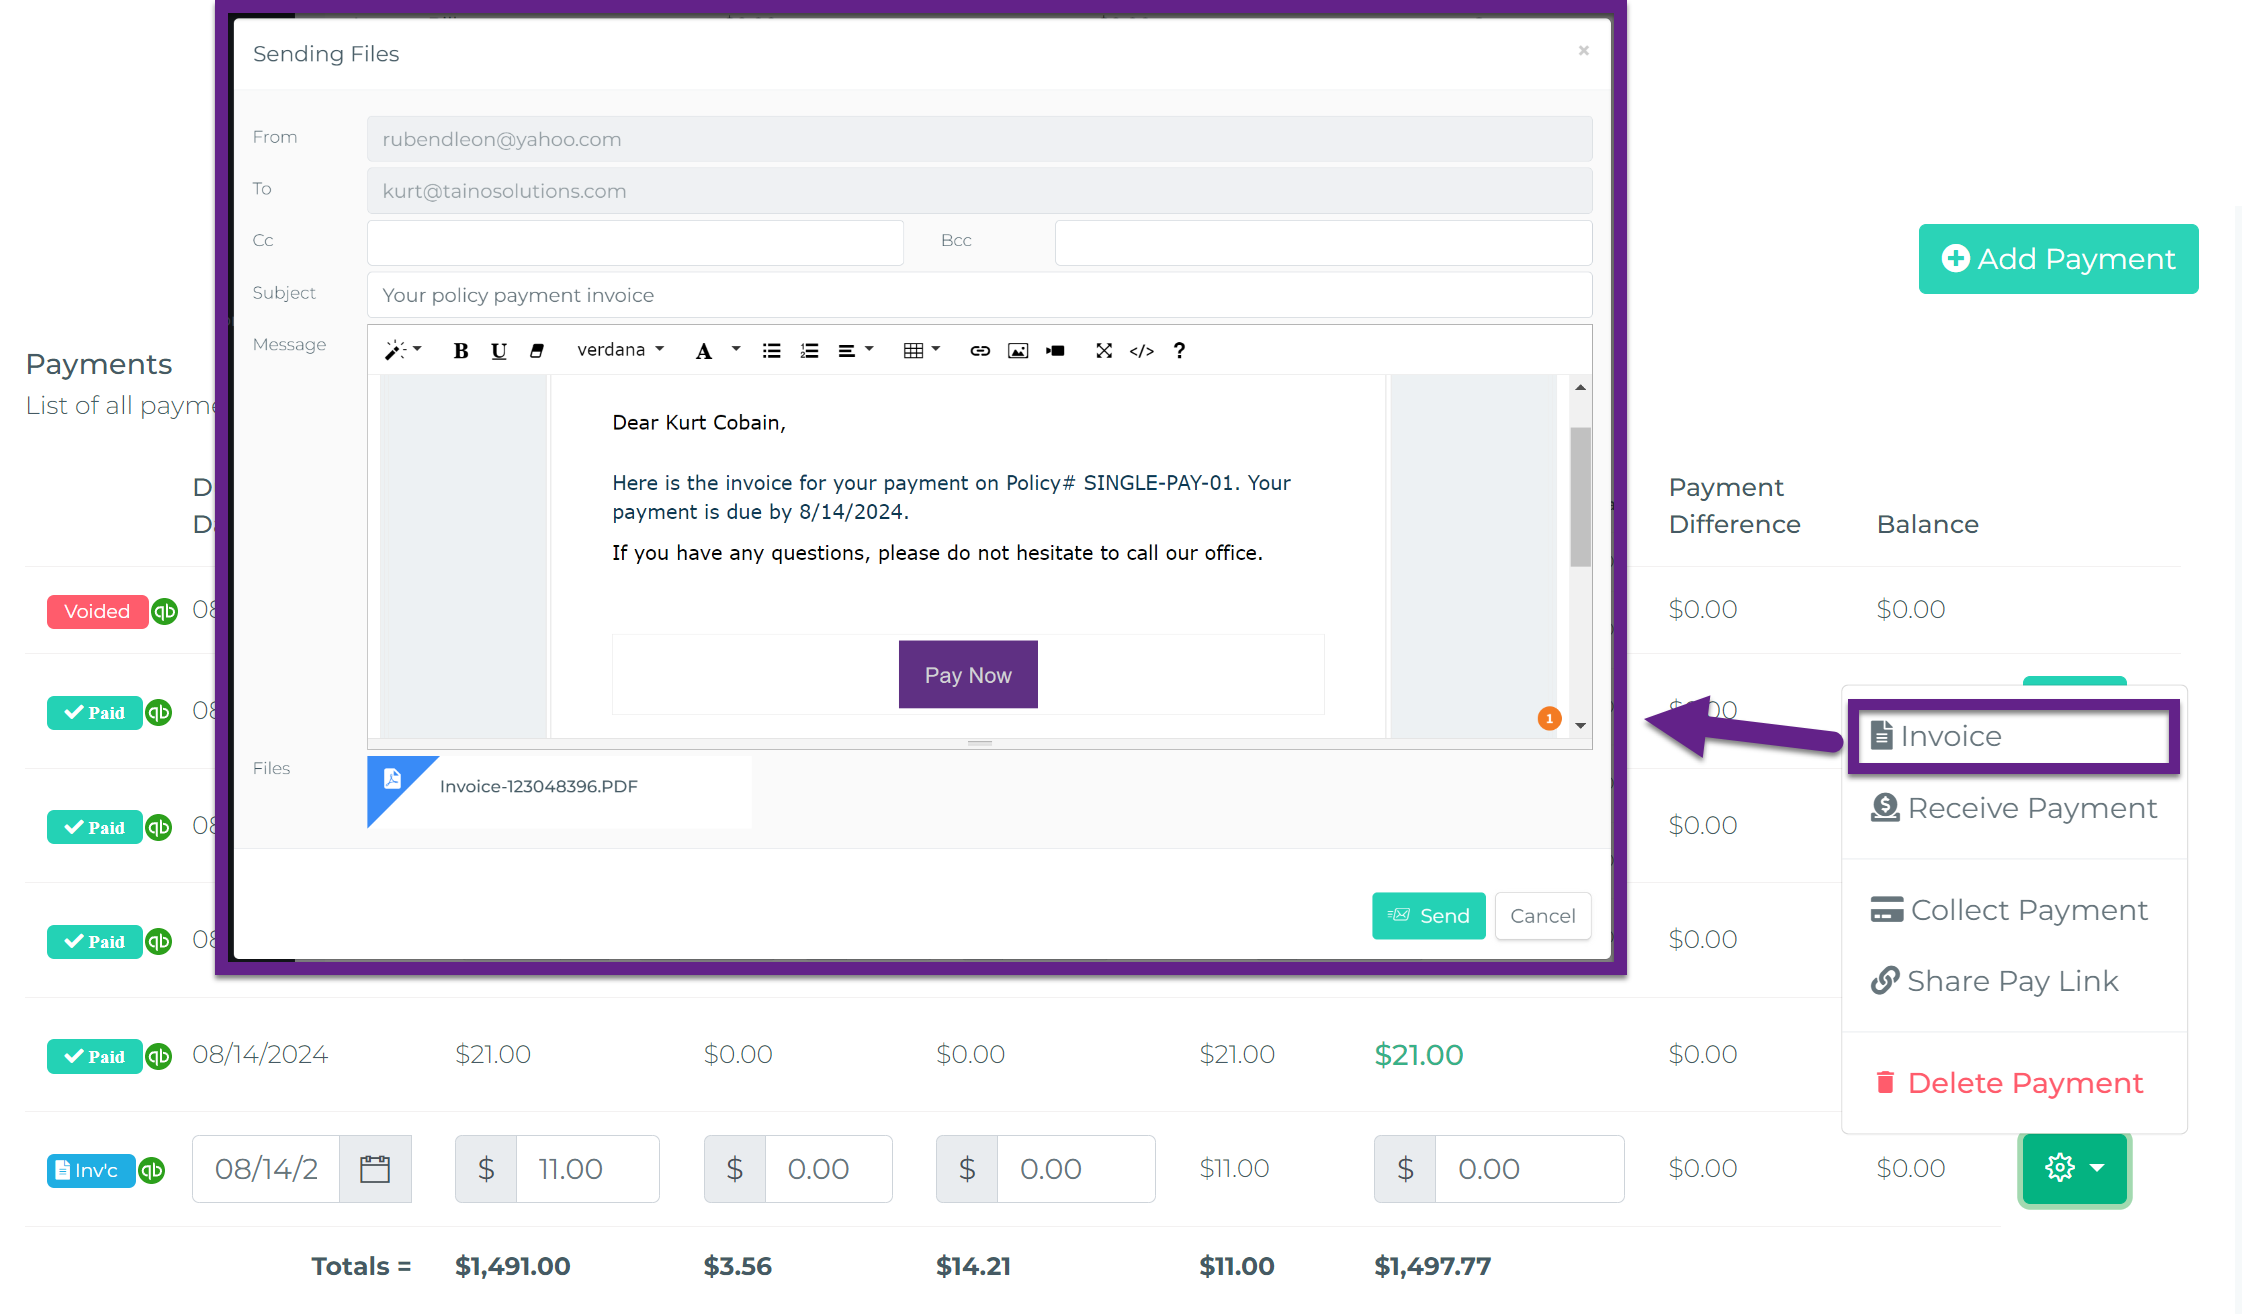
Step 4: Send Invoice with Payment Link
- After saving, click Send Invoice or Email Invoice button
- A checkbox or toggle for "Include Payment Link" should be checked (if you configured this in admin settings)
- Optionally customize the email message
- Click Send
What the Customer Receives:
- Email with invoice PDF attached
- Pay Now button or payment link in the email body
- Clicking the button opens Stripe's secure payment page
- Customer pays and receives instant confirmation
Tracking Invoice Payments:
- Invoice status updates automatically: Sent, Viewed, Paid
- You receive notification when invoice is paid
- Payment is recorded and linked to the invoice
- Customer account balance updates immediately
Automated Invoicing
With the right settings in the administration section and for policies labeled as “Agency Bill,” Taino can automatically send out invoices to customers. An email with the invoice and a payment button is sent 15 days before the due date, and again 48 hours before the due date, ensuring timely payments and reducing the need for manual follow-ups.

Concluding Thoughts
Integrating your payment provider account fully with Taino Solutions not only streamlines payment processing but also enhances data integrity and operational efficiency. With everything in one place, you reduce the risk of errors and ensure that your records are always up to date. Additionally, if you’re using our QuickBooks integration, all payments captured or received through Taino will automatically sync with your QuickBooks account, making financial tracking and reporting even easier. By centralizing these processes, Taino Solutions helps you manage your business more effectively, giving you more time to focus on what really matters—serving your clients.
Watch the video below for a step-by-step tutorial: