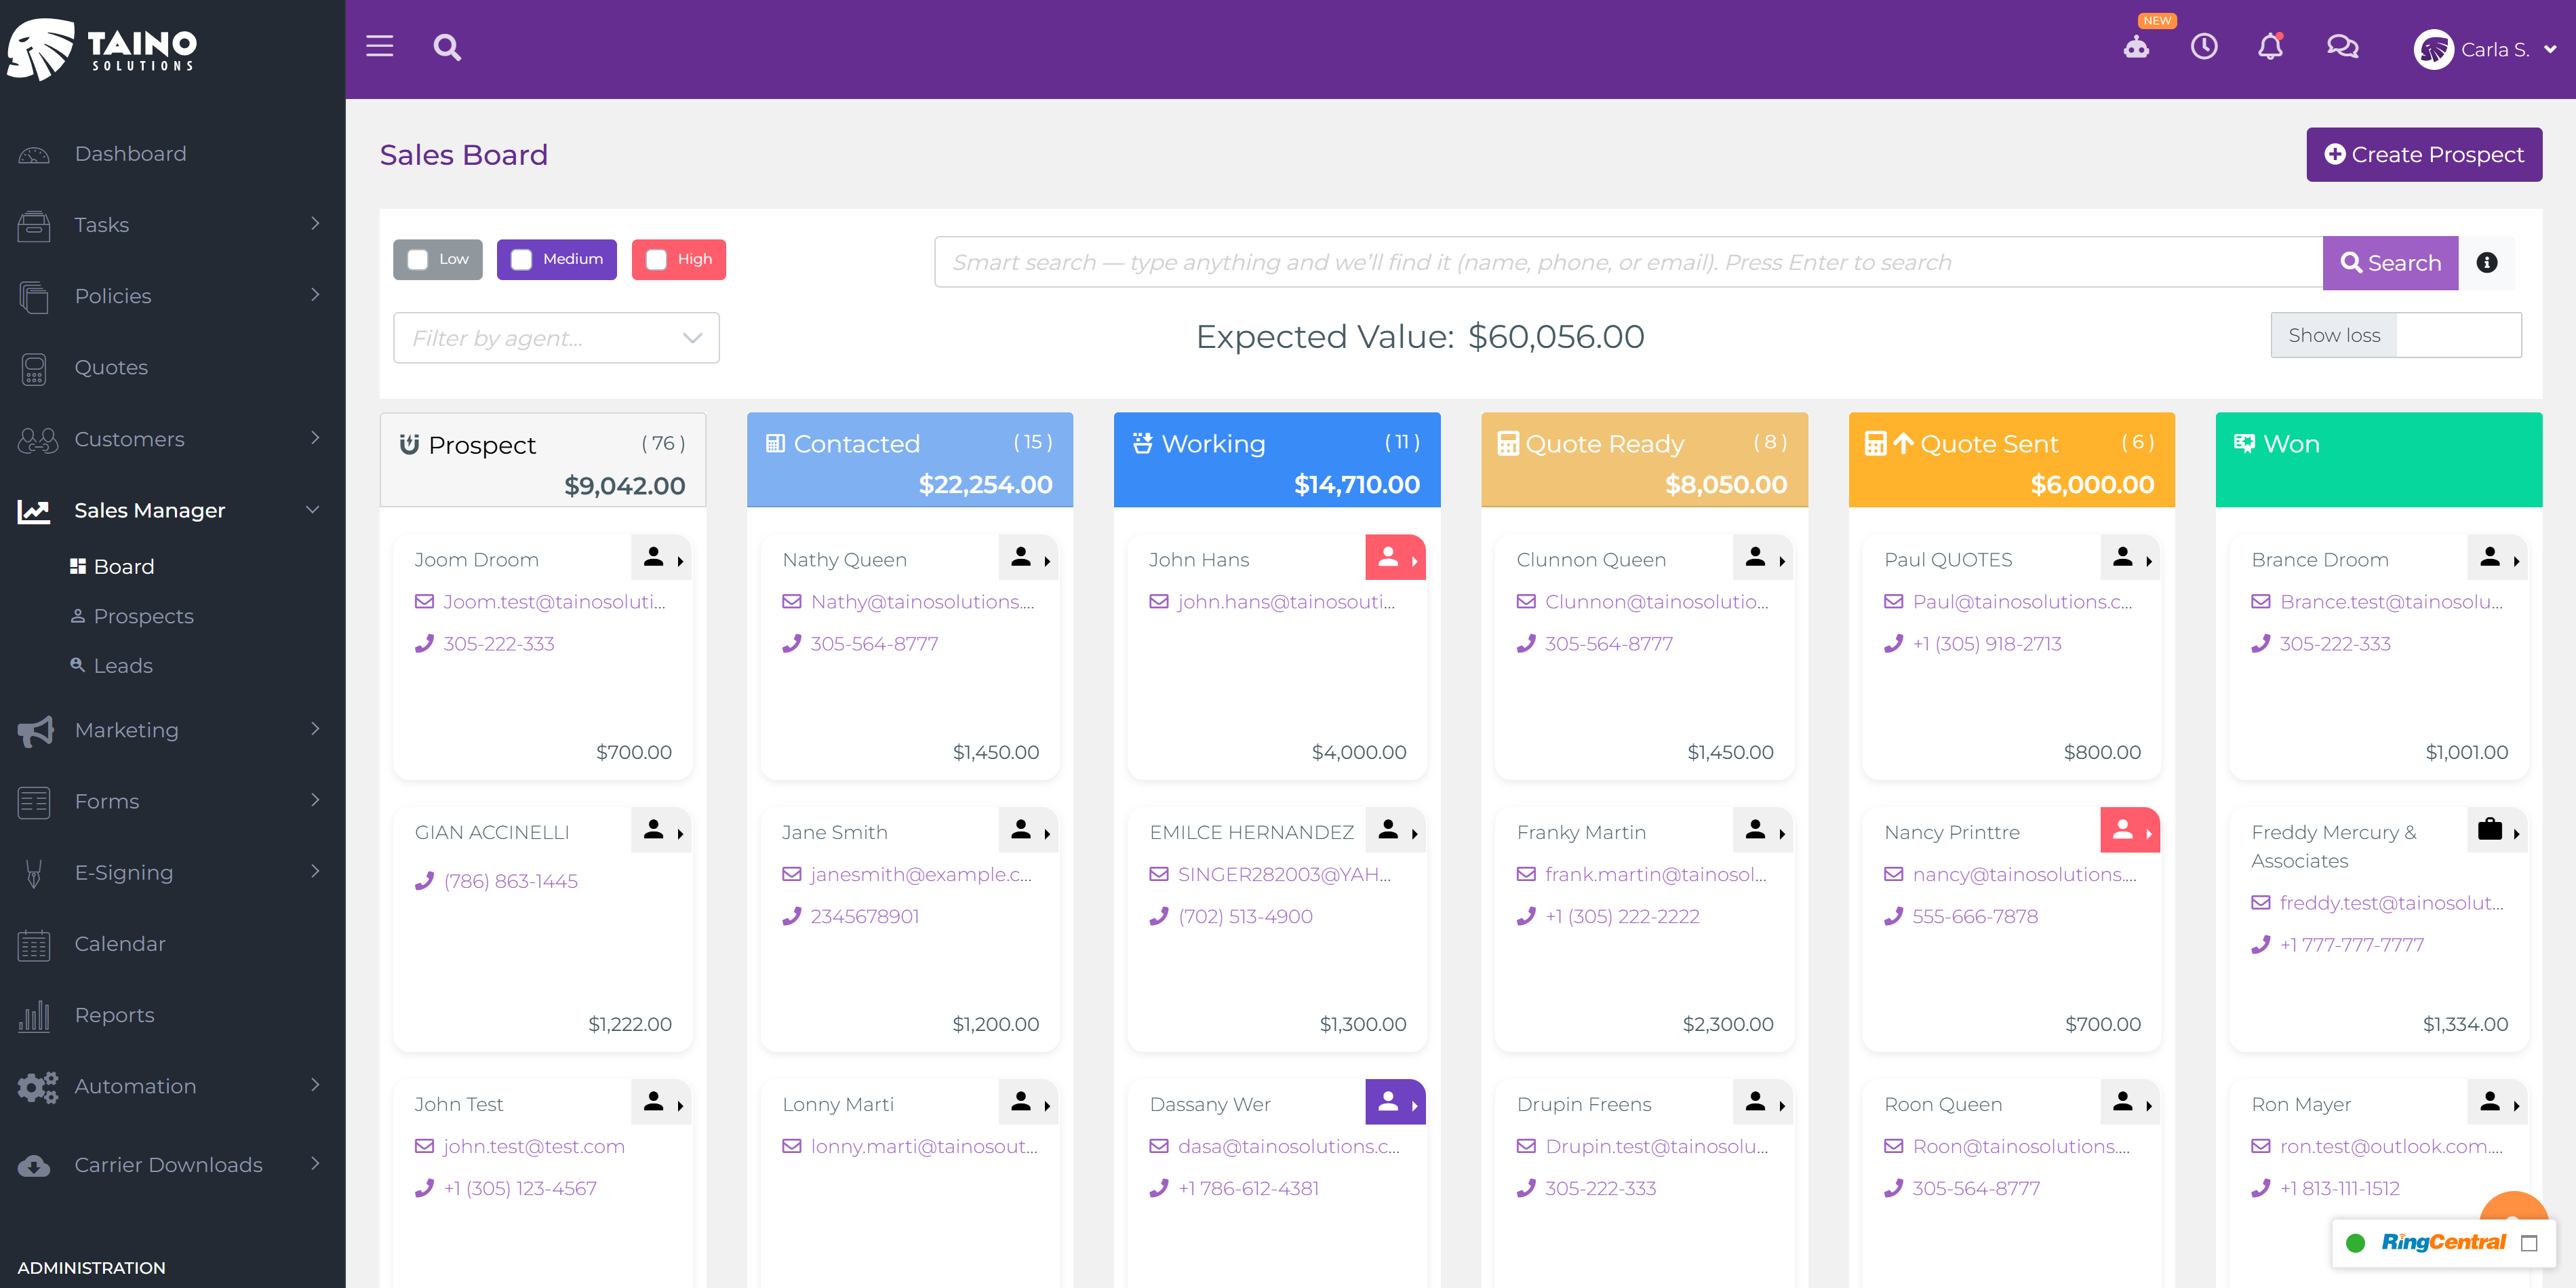
What is the Sales Board?
The Sales Board is your visual command center for managing prospects through every stage of the sales process. Using a Kanban-style interface with vertical columns representing each step of your sales funnel, you can see all your active opportunities at a glance, track their progress, and move them forward with simple drag-and-drop actions.
When a lead becomes a prospect, it enters the Sales Board where you can manage all interactions, communication, and progress until the deal is won or lost. The board helps you stay organized, prioritize high-value opportunities, and never lose track of where each prospect stands in your pipeline.
Understanding the Sales Board Interface
The Sales Board interface is designed for efficiency, with powerful filtering and search tools at the top and your prospect pipeline displayed below in easy-to-scan columns.
Top Toolbar - First Row
The first row of controls helps you filter and search through your prospects:
- Priority Filters (Left): Three checkbox filters—Low, Medium, and High—let you view only prospects with specific priority levels. Check multiple boxes to see prospects with any of the selected priorities. This helps you focus on high-value opportunities or review lower-priority prospects when you have time.
-
Smart Search (Center): The search box works like an intelligent assistant, finding prospects by name, phone number, email, external ID, customer number, or address. Just type what you're looking for and press Enter.
Advanced Search Tips: Click the info icon next to the search box to see special search directives:tel:123-456-7890- Search by phone numbercno:12345- Search by customer numberaddr:9340 NW 21st- Search by street addressext:999orextid:999- Search by external ID
- Create Prospect Button (Right, Purple): Click this button to manually add a new prospect directly to the Sales Board. The prospect creation form opens where you can enter contact information and details. The new prospect will appear in the "New Prospect" column once saved.
Top Toolbar - Second Row
The second row displays high-level metrics and additional filtering options:
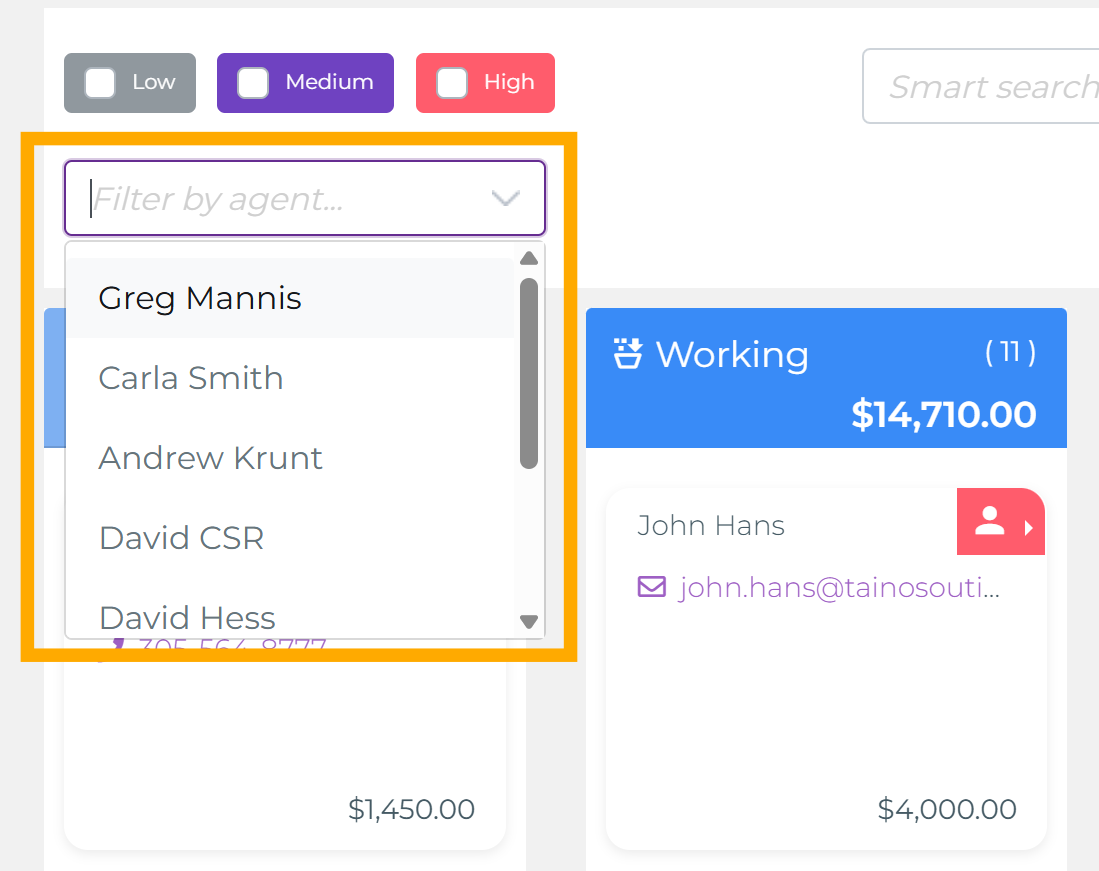
- Agent Filter (Left): This dropdown selector appears only for agency owners, administrators, and users with proper access rights. It allows you to filter the board to show prospects for a specific agent. Regular agents automatically see only their own prospects and won't see this filter at all.
-
Expected Value Total (Center): This displays the total expected value for all prospects currently on your board, excluding Won and Loss columns.
Expected Value total displayed in the center

What does "Expected Value" mean? This is a flexible field that you define based on what's most valuable to your agency's workflow:- Expected commission for the agent
- Expected commission for the agency
- Total agency + agent commission combined
- Full premium amount expected
- Any other dollar value meaningful to your business
The expected value is user-defined per prospect—you set it manually based on your quote or estimate. As prospects move forward and quotes are refined, you can update these values to keep your pipeline forecast accurate. -
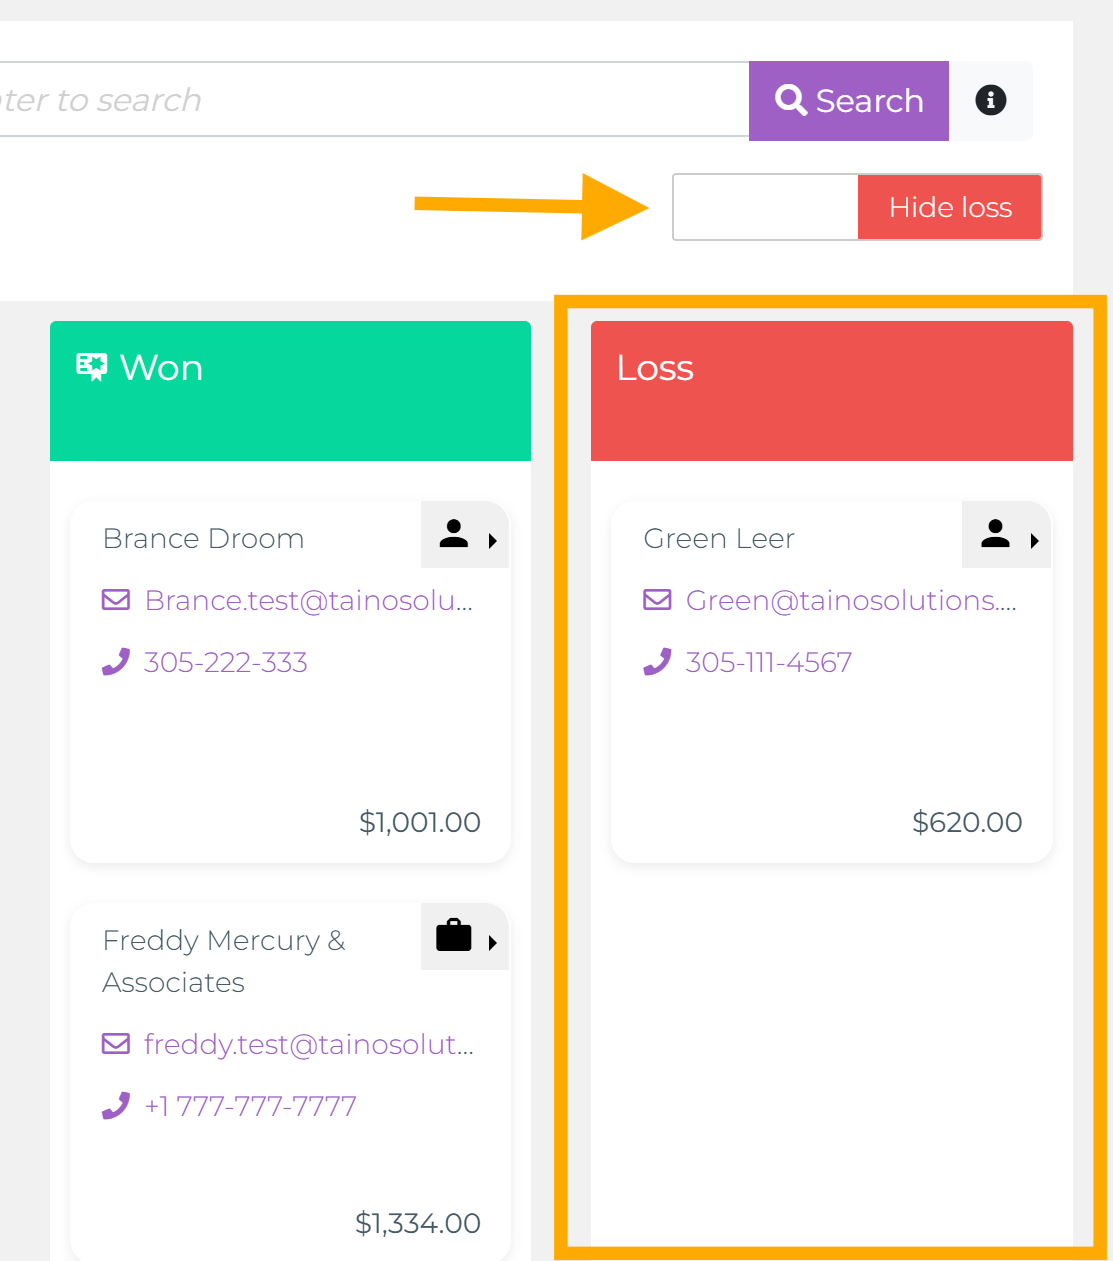
Show/Hide Loss Toggle (Right): This switch controls whether the "Loss" column is visible on your board. When you need to review lost deals or analyze what didn't work, turn it on. When you want to declutter your view and focus only on active opportunities, turn it off. The Loss column appears on the far right of the board.
Show loss toggle switch

The Kanban Columns - Your Sales Pipeline
The Sales Board uses seven columns to represent the stages of your sales process. Each column shows the number of prospects currently in that stage and the total expected value for that group. Move prospects between columns as they progress through your sales funnel.

Understanding Column Headers
Each column header displays two important metrics:
- Prospect Count (Number in parentheses): Shows how many prospect cards are currently in that column. For example, "(76)" means 76 prospects in the New Prospect stage, "(15)" means 15 prospects in the Contacted stage.
- Total Expected Value (Dollar amount): Shows the sum of all expected values for prospects in that column. For example, "$9,042.00" is the combined expected value of all 76 New Prospects, "$22,254.00" is the total for the 15 Contacted prospects.
These headers give you instant insights into where prospects are concentrated in your pipeline and which stages represent the most potential value. If you see a large number of prospects stuck in one column, that's a signal to focus your efforts there and move them forward.
New Prospect
Entry point for all new prospects. When a lead is promoted to a prospect or manually created, it starts here. This represents the initial stage where you've identified a potential customer but haven't yet made meaningful contact.
Contacted
First interaction completed. Move prospects here after you've reached out via phone call, email, SMS, or in-person meeting. This stage indicates you've made initial contact and the prospect is aware of your offer.
Working
Active negotiation and information gathering. Prospects in this column are actively engaged. You're collecting information, answering questions, preparing quotes, and moving toward a proposal. This is where most of your day-to-day sales work happens.
Quote Ready
Quote completed and ready to present. Your quote or proposal is finalized and ready to send to the customer. This is the final review stage before presenting your offer.
Quote Sent
Proposal delivered, awaiting decision. The quote has been sent to the customer, and you're now in follow-up mode. Prospects here are reviewing your offer and deciding whether to move forward. Stay engaged with reminders and answer any questions they have.
Won
Deal closed successfully. The customer accepted your quote and the prospect is now converting to an active policy. Prospects in this column are not included in the expected value total since the deal is already won. Congratulations!
Loss (Optional - Show/Hide)
Deal lost to competitor or customer declined. Prospects here represent opportunities that didn't close—the customer went with another agent, decided not to purchase, or the timing wasn't right. These are not included in the expected value total. You can show or hide this column using the toggle switch to keep your board focused on active opportunities.
Working with Prospect Cards
Each prospect appears as a card within a column. Cards display key information and provide quick-access buttons for common actions, so you can communicate with prospects and manage details without leaving the Sales Board.
Card Information Display
Each card shows:
- Prospect Name: The customer's name or business name
- Contact Icons: Quick-access buttons for email, SMS, and phone calls
- Email Address: Displayed with envelope icon (click to send email)
- Phone Number: Displayed with phone icon (click to call if RingCentral is integrated)
- Expected Value: Dollar amount shown at bottom of card (click to edit)
- Priority Indicator: Color-coded badge (Low, Medium, or High) when priority is set
Quick Communication Actions
The icons on each card let you communicate with prospects instantly:
- Email (Envelope Icon): Click to compose and send an email directly from the platform. All emails are tracked in the prospect's communication history, so you have a complete record of your interactions.
- SMS/Text (Message Icon): Send a text message to the prospect using the built-in SMS feature or your RingCentral integration. Messages are logged automatically in the prospect record.
- Phone Call (Phone Icon): If you have RingCentral integrated, click to place a call directly from the platform. Call activity is tracked in the prospect's history.
Card Menu Options
Click the three-dot menu icon on any card to access additional options:
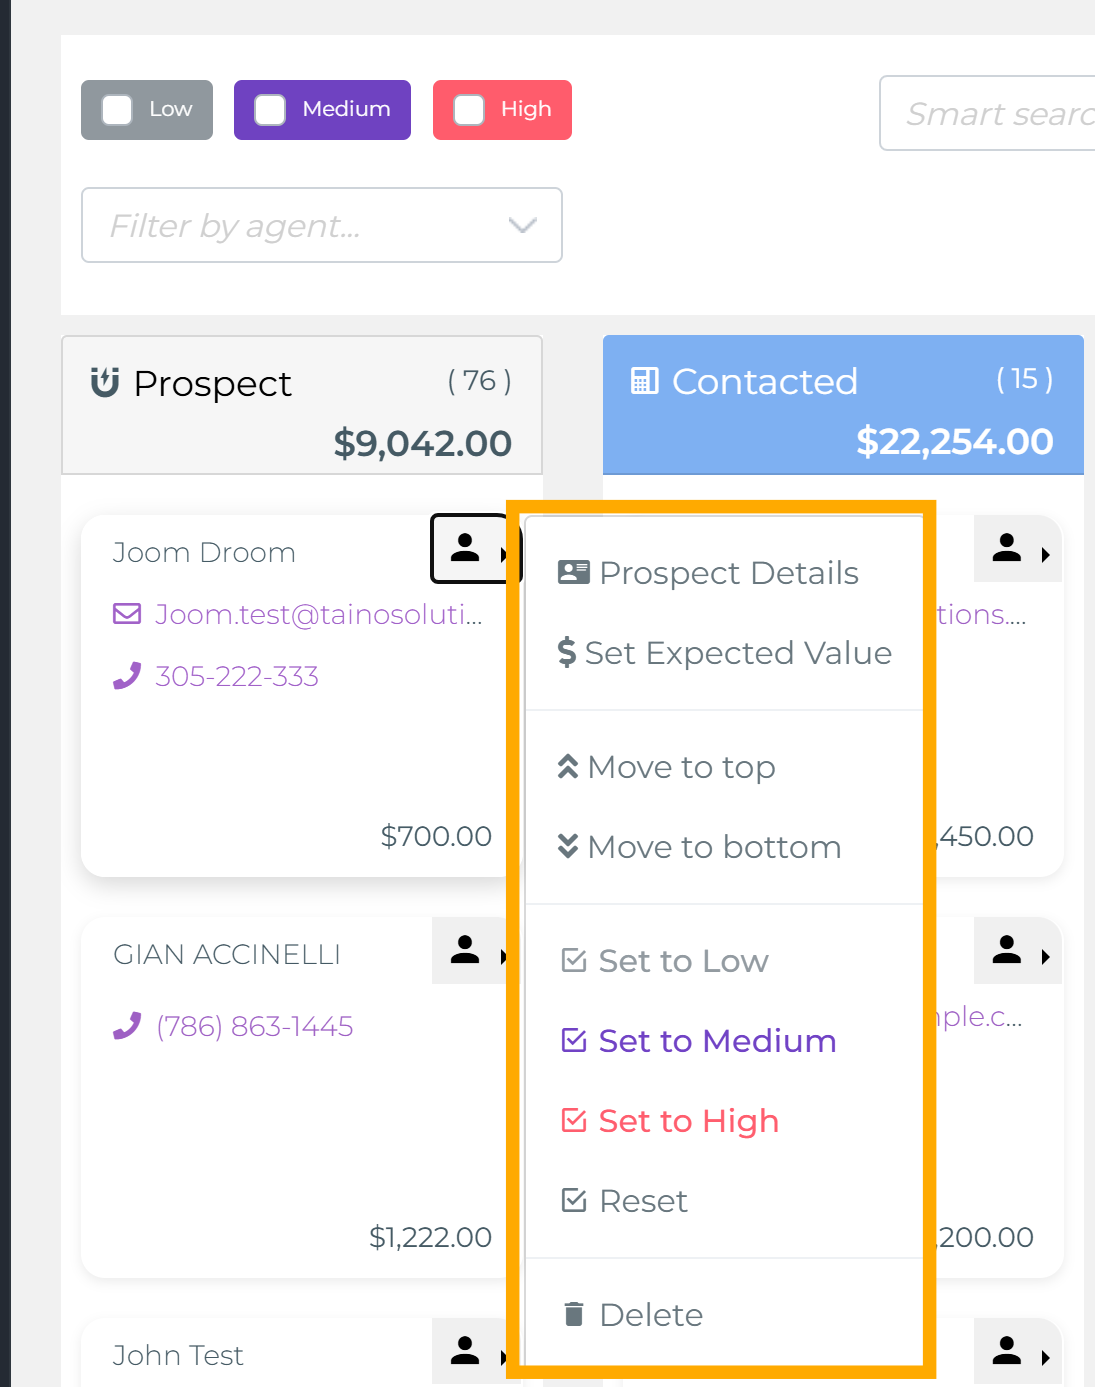
- Prospect Details: Opens a modal window with complete prospect information including contact details, notes, tasks, policies, quotes, campaigns, activity history, and documents. This gives you a comprehensive view without navigating away from the Sales Board.
- Set Expected Value: Opens a popup where you can assign or update the expected value for this prospect. This value represents what you expect to earn or close (commission, premium, etc.) and affects the total expected value displayed at the top of the board.
- Move to Top: Instantly moves the card to the top of its current column. Use this to prioritize prospects you want to work on first when you review that column.
- Move to Bottom: Moves the card to the bottom of its current column. Useful for deprioritizing prospects you'll address later.
-
Set to Low / Medium / High: Assign a priority level to the prospect. A color-coded badge appears on the card:
- Low: Lower-priority opportunity (Gray badge)
- Medium: Standard priority (Purple badge)
- High: High-value or urgent opportunity (Red badge)
- Reset: Clears the priority setting, removing the colored badge from the card.
- Delete: Permanently removes the prospect card from the Sales Board. This option is only available to users with delete permissions (typically administrators). Use this carefully as it cannot be undone.
Setting Expected Value (Two Ways)
You can set or update a prospect's expected value in two convenient ways:
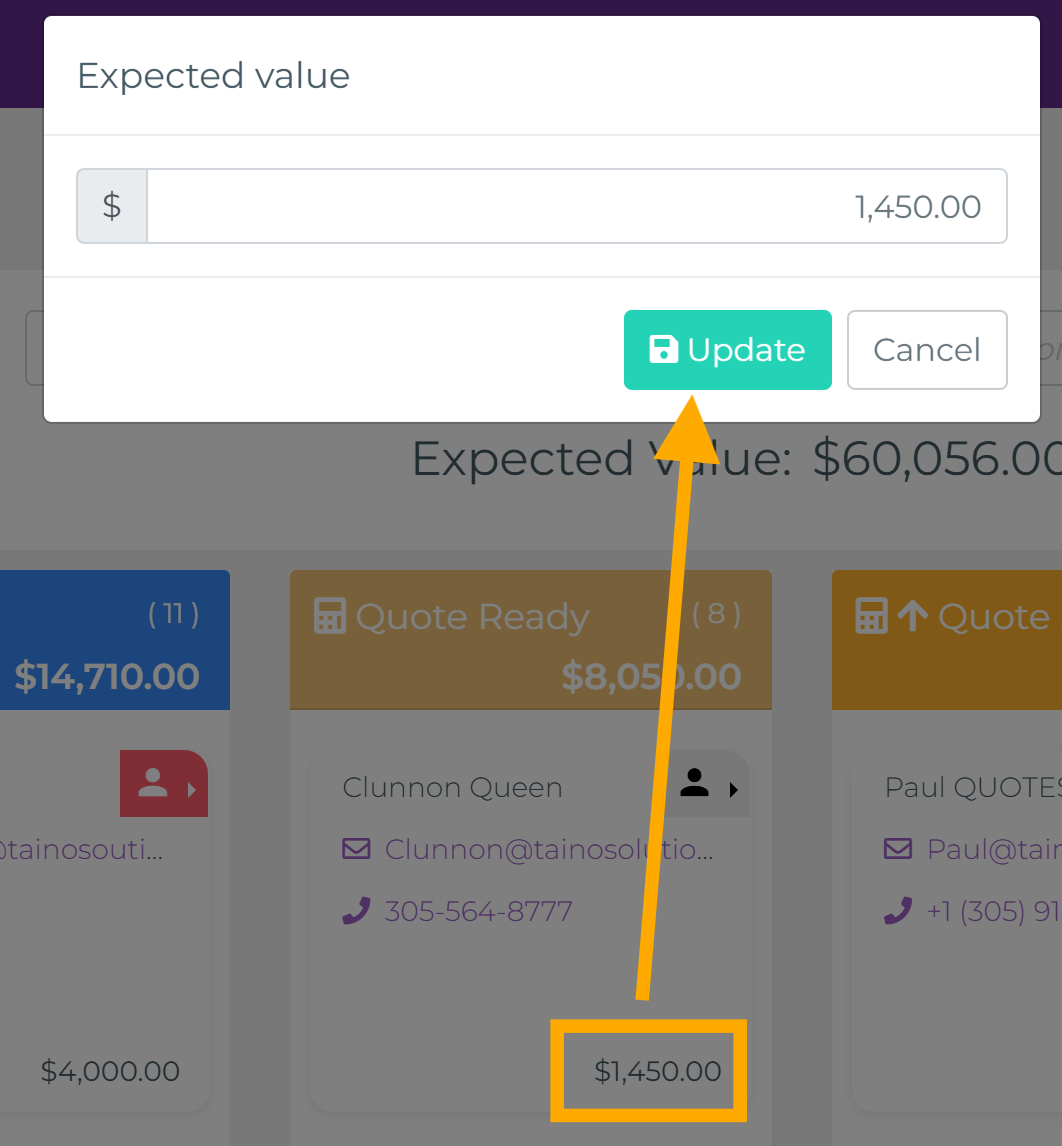
- Quick Click on Card: Click directly on the dollar amount displayed at the bottom of any prospect card. The expected value popup appears immediately where you can enter or update the amount and click "Update."
- From Card Menu: Click the three-dot menu icon on the card, then select "Set Expected Value" from the dropdown menu. The same popup appears for you to enter the amount.
After updating, the new expected value appears on the card and is included in the total expected value calculation displayed at the top of the board.
Viewing Prospect Details
Click "Prospect Details" from the card menu to open a comprehensive modal showing everything about the prospect:
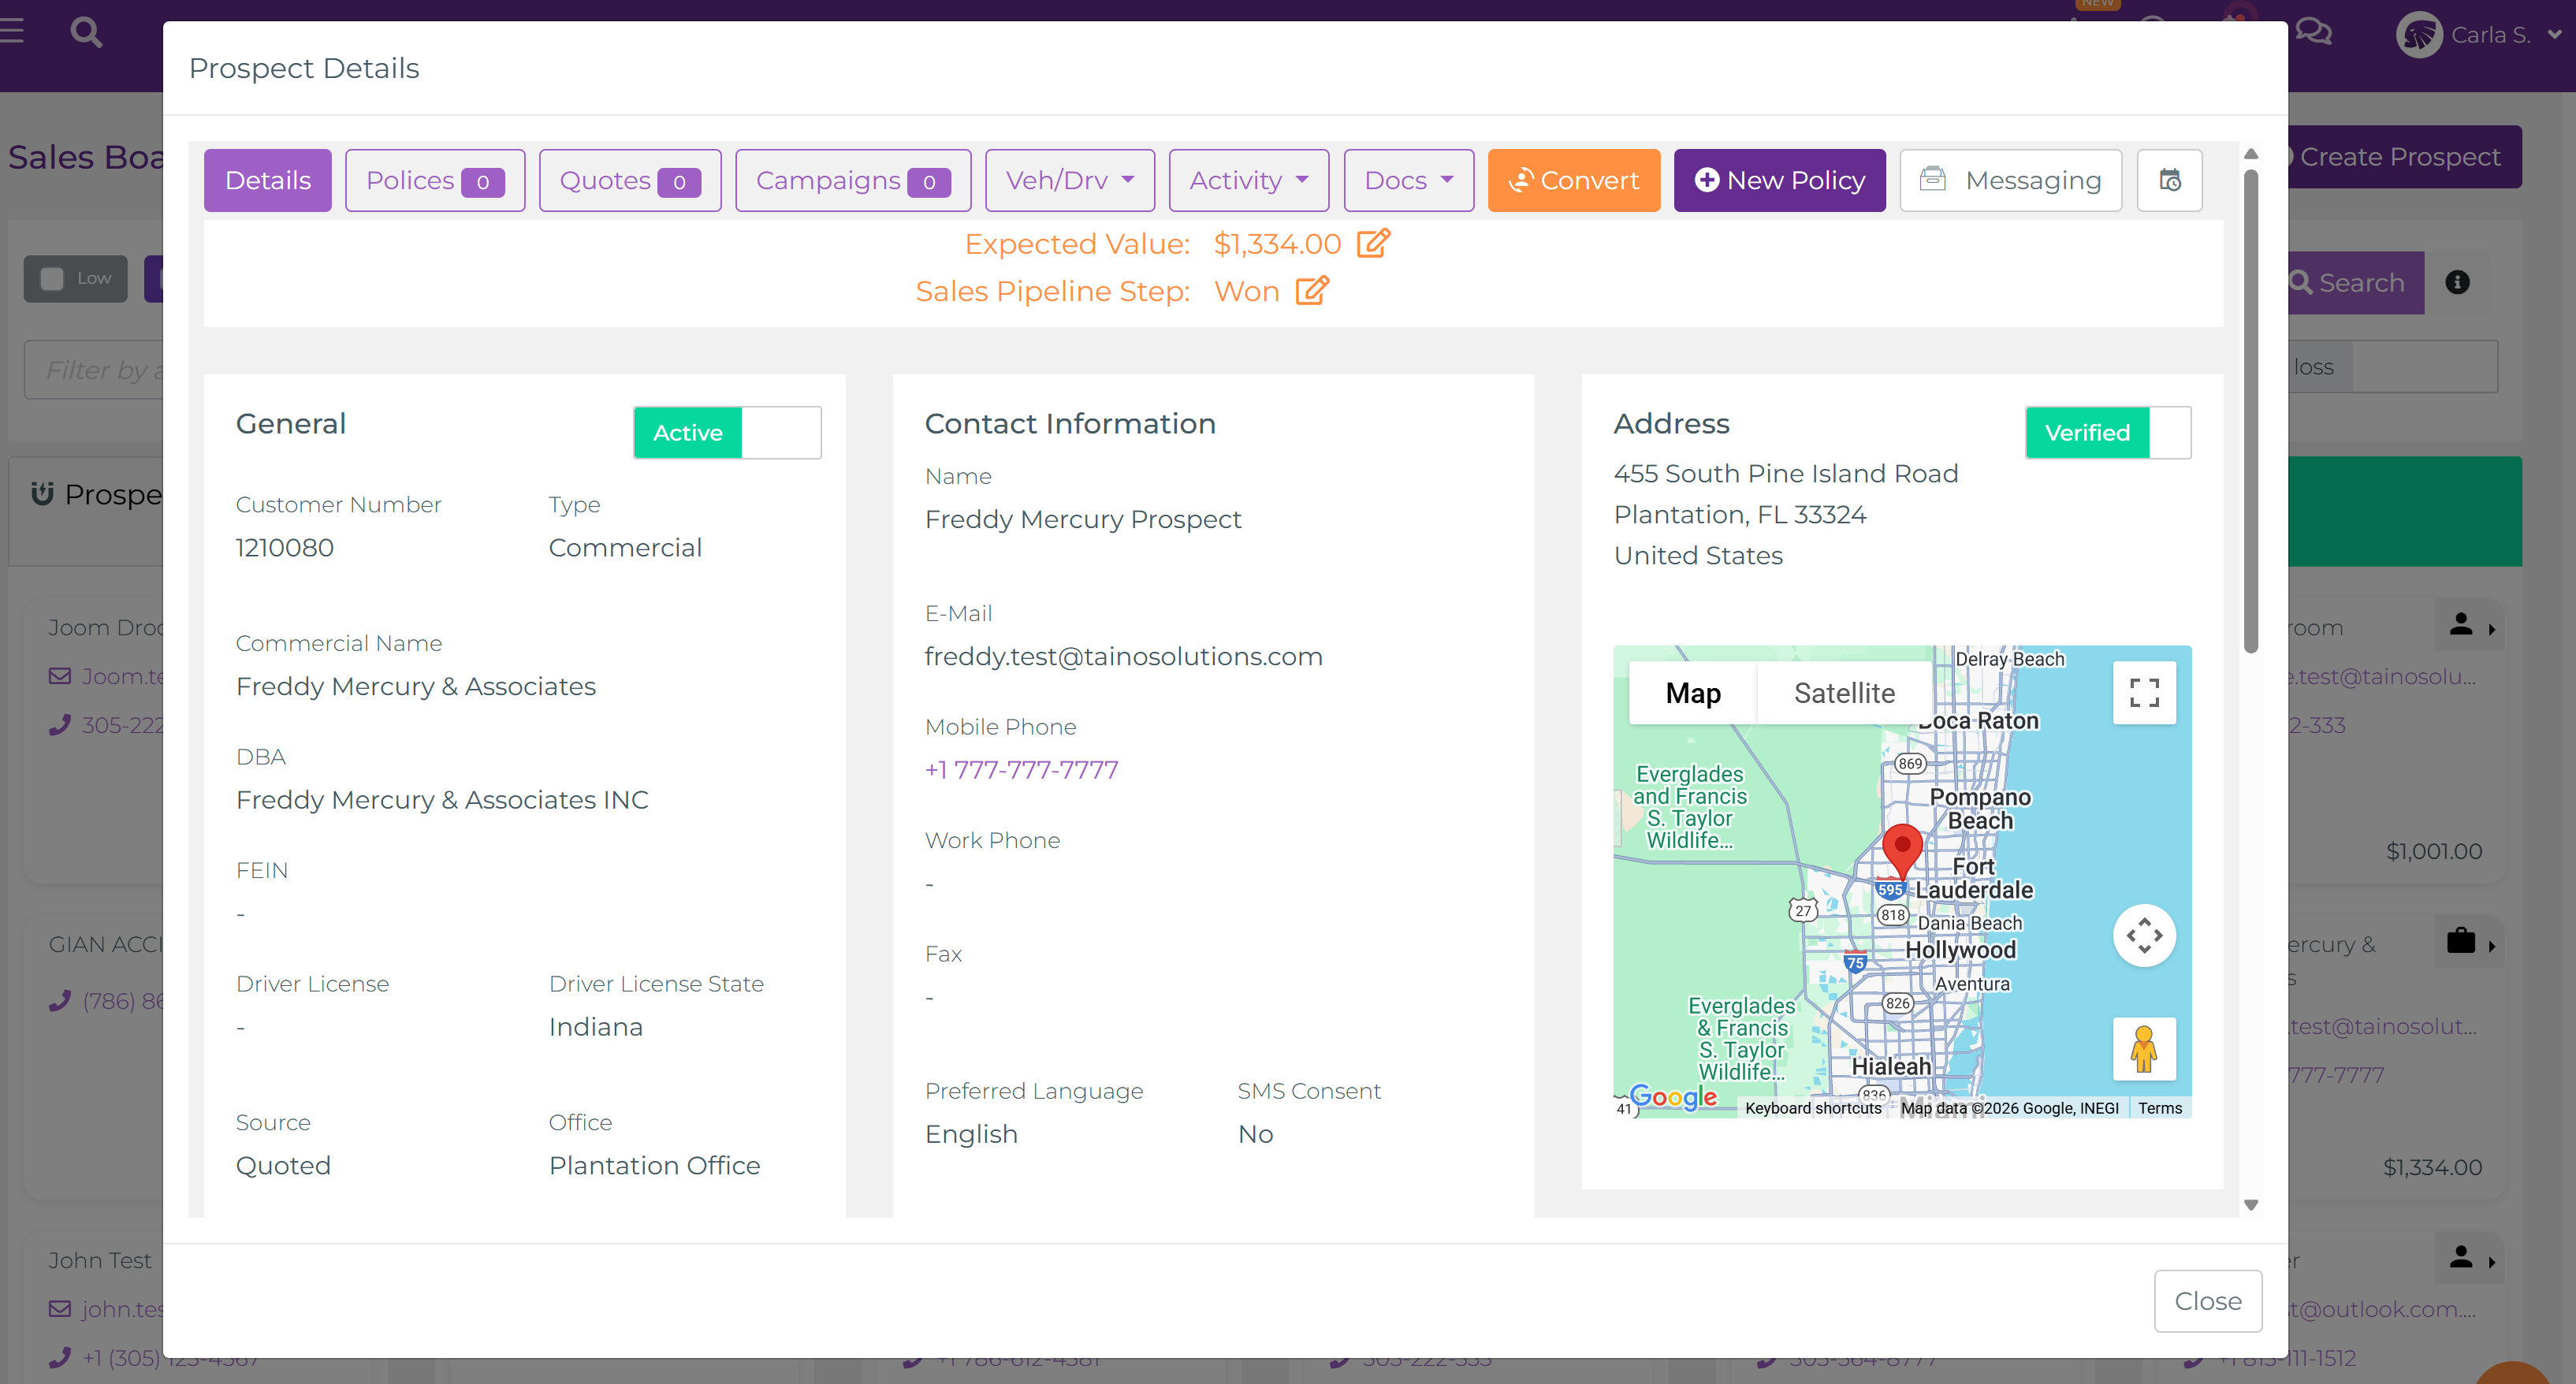
The modal includes multiple tabs:
- Details: General information, contact details, address, and verification status
- Polices: Any policies already associated with this prospect
- Quotes: All quotes created for this prospect
- Campaigns: Marketing campaigns the prospect has been included in
- Veh/Drv: Vehicle and driver information (for auto insurance)
- Activity: Complete history of tasks, calls, emails, SMS, and interactions
- Docs: Documents uploaded or generated for this prospect
At the top of the modal, you'll see the current Expected Value (click to edit) and Sales Pipeline Step (click to change column). There are also buttons to convert the prospect to a customer, create a new policy, or send messages.
Moving Prospects Through the Pipeline
The power of the Sales Board is how easily you can move prospects forward as they progress through your sales process.
Drag and Drop
To move a prospect to a new stage:
- Click and hold on any prospect card
- Drag the card to the target column (the column will highlight to show where you're dropping)
- Release to drop the card in the new column
- The card automatically saves its new position and the prospect's stage is updated in the system
You can also reorder cards within the same column by dragging them up or down. This helps you prioritize which prospects to work on first when reviewing a specific stage.
What Happens When You Move a Card?
Moving a prospect between stages does more than just update the visual position on the board. Depending on your agency's configured Sales Automation pipelines, moving a card can automatically trigger a series of actions:
- Tasks Created: Follow-up tasks assigned to you or team members
- Emails Sent: Personalized emails automatically sent to the customer (e.g., "Thanks for your interest!" or "Here's your quote")
- Custom Web Forms Sent: Links to online forms requesting additional information from the customer
- Documents Auto-Generated: Quotes, contracts, or policy documents created based on templates
- E-Signature Requests: Documents sent to the customer for electronic signing
- SMS Notifications: Text messages delivered to the customer or internal team
- Internal Notifications: Alerts sent to managers or other agents about stage changes
These automations run in the background, so you can focus on conversations and closing deals rather than administrative tasks. The more stages you automate, the more efficient your sales process becomes.
Best Practices for Using the Sales Board
Get the most out of your Sales Board by following these best practices used by top-performing agents:
Keep Prospects Moving
- Review your Sales Board every morning to identify which prospects need attention
- Move prospects forward as soon as actions are completed (after a call, move from "New Prospect" to "Contacted")
- Don't let prospects stagnate in one column for too long—set reminders to follow up
- If a prospect isn't responding, consider moving them to "Loss" to keep your active pipeline clean
Use Expected Value Strategically
- Define clearly what "expected value" means for your agency (commission, premium, etc.) so your entire team uses it consistently
- Update expected values as you refine quotes and learn more about the prospect's needs
- Watch the total expected value trend over time using Dashboard widgets to forecast your performance
- Focus your efforts on high-value opportunities when time is limited
Leverage Priority Settings
- Mark high-value or time-sensitive opportunities as "High" priority immediately
- Use the priority filter checkboxes to plan your day—start with "High" priority prospects
- Review "Low" priority prospects weekly to see if any should be upgraded or moved to "Loss"
- Adjust priorities as circumstances change (e.g., a prospect's renewal date approaches)
Take Advantage of Quick Actions
- Use the in-board email, SMS, and call buttons to save time—no need to switch platforms
- All communication is tracked automatically, so your records stay complete without extra data entry
- Send quick check-in texts using SMS right from the card
- Use the "Prospect Details" modal for a quick overview before calling a prospect
Regular Cleanup
- Turn on the "Show loss" toggle periodically to review lost prospects
- Archive or delete old lost prospects to keep the Loss column manageable
- If a prospect has been inactive for too long, have a conversation or move them to "Loss" to keep your pipeline accurate
- Keep your board focused on active opportunities you're genuinely working
Access and Permissions
Understanding who can see what on the Sales Board helps you navigate the interface and understand why certain features may or may not be visible to you.
Who Can Access the Sales Board?
- All agents with Sales Manager module access can view and use the Sales Board
- Regular agents see only their own prospects—the board automatically filters to show prospects assigned to them
- Admins, owners, and users with proper access rights can use the agent filter dropdown to view all agents' prospects or filter by a specific agent
Required Permissions
- View Sales Board: Sales Manager module access
- Create Prospects: Customer Create permission (controls whether "Create Prospect" button appears)
- Delete Prospects: Customer Delete permission (controls whether "Delete" option appears in card menu—typically admin-only)
- View All Agents: Admin/Owner access rights (controls whether agent filter dropdown is visible)
How to Access
- Open the Sales Manager menu in the left navigation panel
- Select Board from the menu options
- The board loads with your active prospects (or all agents' prospects if you're an admin and no filter is applied)
Related Features and Next Steps
The Sales Board is even more powerful when combined with other features in the platform. Enhance your sales process with these related tools:
Automate Your Sales Process
- Sales Automation: Set up automated pipelines that trigger actions when prospects move between stages. Create tasks, send emails, generate documents, and request e-signatures automatically.
Manage Leads Before They Become Prospects
- Import and Manage Leads: Before leads enter the Sales Board as prospects, import them in bulk and manage them with powerful tools. Learn about Lead Management
- Targeted Lists: Create targeted contact lists using custom rules for marketing campaigns. Learn about Targeted Lists
Track Quotes and Sales Performance
- Managing Quotes: Create, import, and track quotes throughout the sales process. Learn about Quote Management
- Dashboard Analytics: Monitor your sales pipeline and expected value trends with visual charts:
- Sales Volume Planning Outcomes - Compare planned vs actual sales
- Commission Pipeline Tracking - Visualize your commission pipeline
Learn More
- Sales Manager Overview: Get a high-level introduction to the entire Sales Manager module. Read the Sales Manager guide